some painting application refs for TAD
I promised I'd post these up.
I've got some more I'll add here, but for now these are a few that I had shown the other day in class:
I've got some more I'll add here, but for now these are a few that I had shown the other day in class:
 |
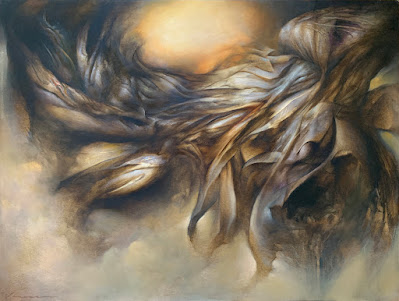
| above: a few scribbles and swatches to demonstrate different ways to apply paint. Click the image to view the textures and notes larger and more clearly. I posted this file pretty large for that reason. so.. go! grab it and use it. :) |
 |
| this was done with acrylic, layering on top of a bright thin stain of yellow and alizarin and some blue too, letting that dry, then adding thicker paint, then swiping it away with a shaper tool, then adding more paint, letting it dry again, and swiping away with a shaper tool and dripping the edges with very thin (with water) paint. the same can be done with oil (the drying time would be longer), or a combination of acrylic first then oil. |
 |
| this painting was done in oil. it was done as a demo from life for a still life class at Studio 2nd Street. it was a 2-week set-up. The first week was spent doing a monochromatic drawing in paint first with a stain of burnt umber with some canvas showing through (the orange look for the thinned paint where turp was thrown at the canvas to pick out to canvas, leaving a lighter stain (more canvas showing through in lighter stained areas). Then the clown was painted with burnt umber for darks and white for lights. The lights are not only light, but cooler because of the addition of white. The 2nd week of the set-up was a stain of purple (ultramarine and alizarin), applied thin over the dry monochromatic painting. Then more colorful darker darks (still kept thin) were added to the clown, and opaque paint was added to the lights. Colorful lights (not just white, but white with blues, yellows, oranges added). The mid-tone shadow areas are part painted with thin coats and part left as what was underneath from the initial monochromatic stage of the painting, adding only clear glaze to some parts of those areas (such as the shadow on the collar). |

Comments